Create & Upload a Linux Image (incl. Xinchuang)
New upload method: use the linuxupload tool (
diskless_upload.sh). A single command handles driver build, disk partitioning, bootloader install and system upload, all through a wizard. It supports x86_64 and Xinchuang multi-arch (arm64 / loongarch64 / mips64el / riscv64); the script auto-selects the right binary based onuname -m.
1) Install the OS normally
Install Linux as usual on a physical machine or VM (including Xinchuang systems such as Kylin, UOS, openEuler, Anolis). Finish the basic setup and install the software you need.
2) Get and extract the tool
Download the Linux packaging tool linuxupload.tar.gz, copy it to the installed Linux system and extract it:
Please contact customer service to obtain the tool.
mkdir linuxupload
tar -xzf linuxupload.tar.gz -C linuxupload
cd linuxupload
ls -lah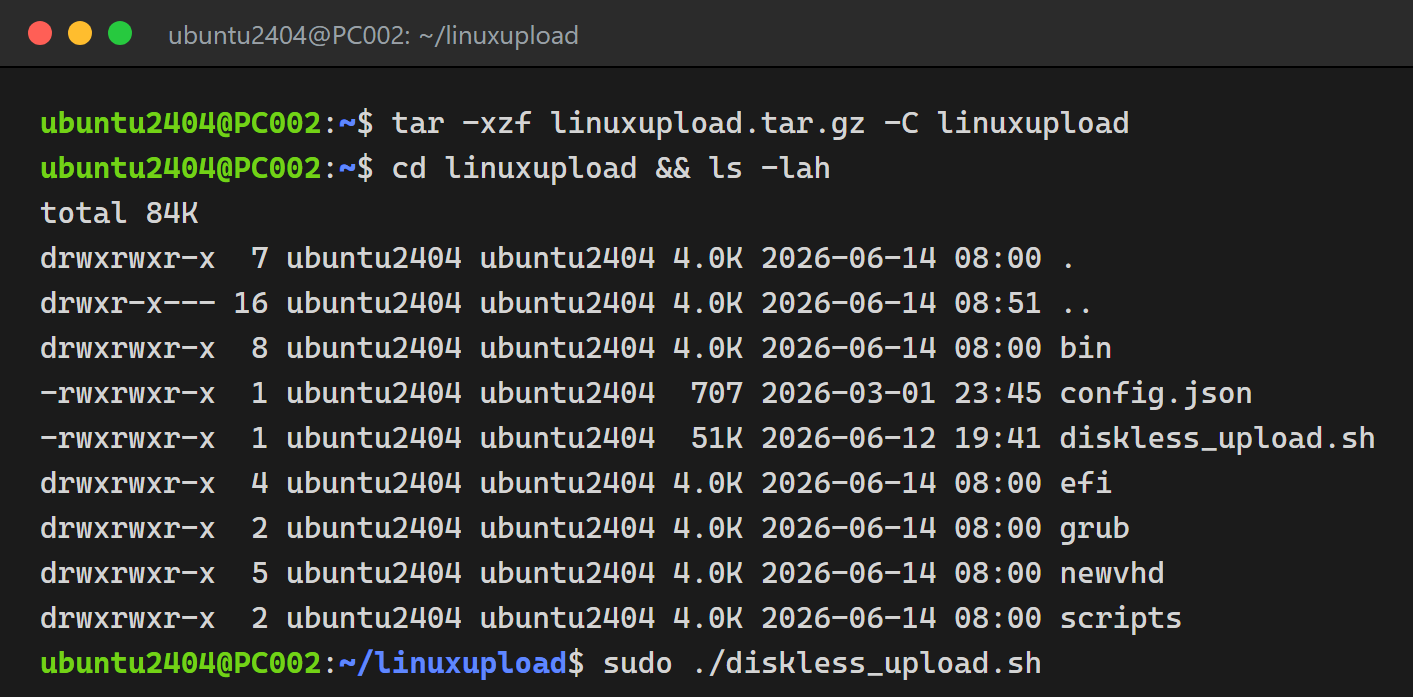
About the contents: diskless_upload.sh is the main upload script; bin/ holds the per-architecture binaries (vdmount / vdclient / rb_client, etc.), while efi/, grub/, scripts/ and newvhd/ are boot and client files.
3) Run the upload tool
⚠️ About security hardening on Xinchuang systems: Xinchuang systems such as Kylin, UOS, openEuler and Anolis enable security hardening by default (KYSEC, SELinux, developer-mode signature checks, etc.). This causes two kinds of problems:
- Privilege blocking — driver compilation, partitioning or disk writes may be blocked outright;
- Rescan that slows down / freezes the upload (more subtle) — for example, Kylin's KYSEC rescan daemon measures every file written to the network disk and reads it all back over the network, saturating bandwidth and starving the upload's writes. The symptom: the upload reaches partway, then throughput collapses or drops to zero and appears stuck. If your upload loses all progress mid-way, it is almost always the security mechanism rescanning — disable it and it recovers.
✅ The new
diskless_upload.shalready handles this automatically: before uploading it temporarily disables KYSEC, stops the rescan daemon, and pauses common antivirus (QAX / 360 / Kylin avserver / ClamAV, etc.), printing a notice on screen. In most cases you do not need to do anything manually.
If the automatic handling does not cover your system (best-effort), or the upload is still blocked / slows down mid-way, disable security manually per the table below before running the script (all require root / sudo):
| Xinchuang system | Security mechanism | How to disable / enter |
|---|---|---|
| Kylin / NeoKylin (V10, V11, desktop & server) | KYSEC (Kylin security) | In a terminal run sudo setstatus disable to disable temporarily; add -p to make it permanent (sudo setstatus disable -p, stays off after reboot). The server edition also supports sudo security-switch --set custom; if needed, change the GRUB boot parameter security=kysec to an empty security=. |
| UnionTech UOS | Developer mode | Control Center → General → Developer Mode, then activate online (log in with a UnionID) or offline (export the machine info → download and import the offline certificate); after enabling, run sudo passwd root in a terminal to set a root password. Note: developer mode is a one-way operation — it disables signature verification and cannot be reverted. |
| deepin | Developer mode / root | Same as UOS developer mode; or run sudo passwd root to set a password, then su - to switch to root. |
| openEuler | SELinux | Temporary: sudo setenforce 0 (sets permissive); permanent: edit /etc/selinux/config, set SELINUX=disabled, then reboot. |
| Anolis / Red Hat-based (RHEL, CentOS, Rocky, Alma, etc.) | SELinux | Same as openEuler: sudo setenforce 0 (temporary) / set SELINUX=disabled in /etc/selinux/config and reboot (permanent). |
To restore security hardening after the upload: on Kylin run
sudo setstatus enable -p; for SELinux setSELINUX=enforcingin/etc/selinux/configand reboot. UOS developer mode cannot be reverted once enabled — please be aware.
Run the script as root:
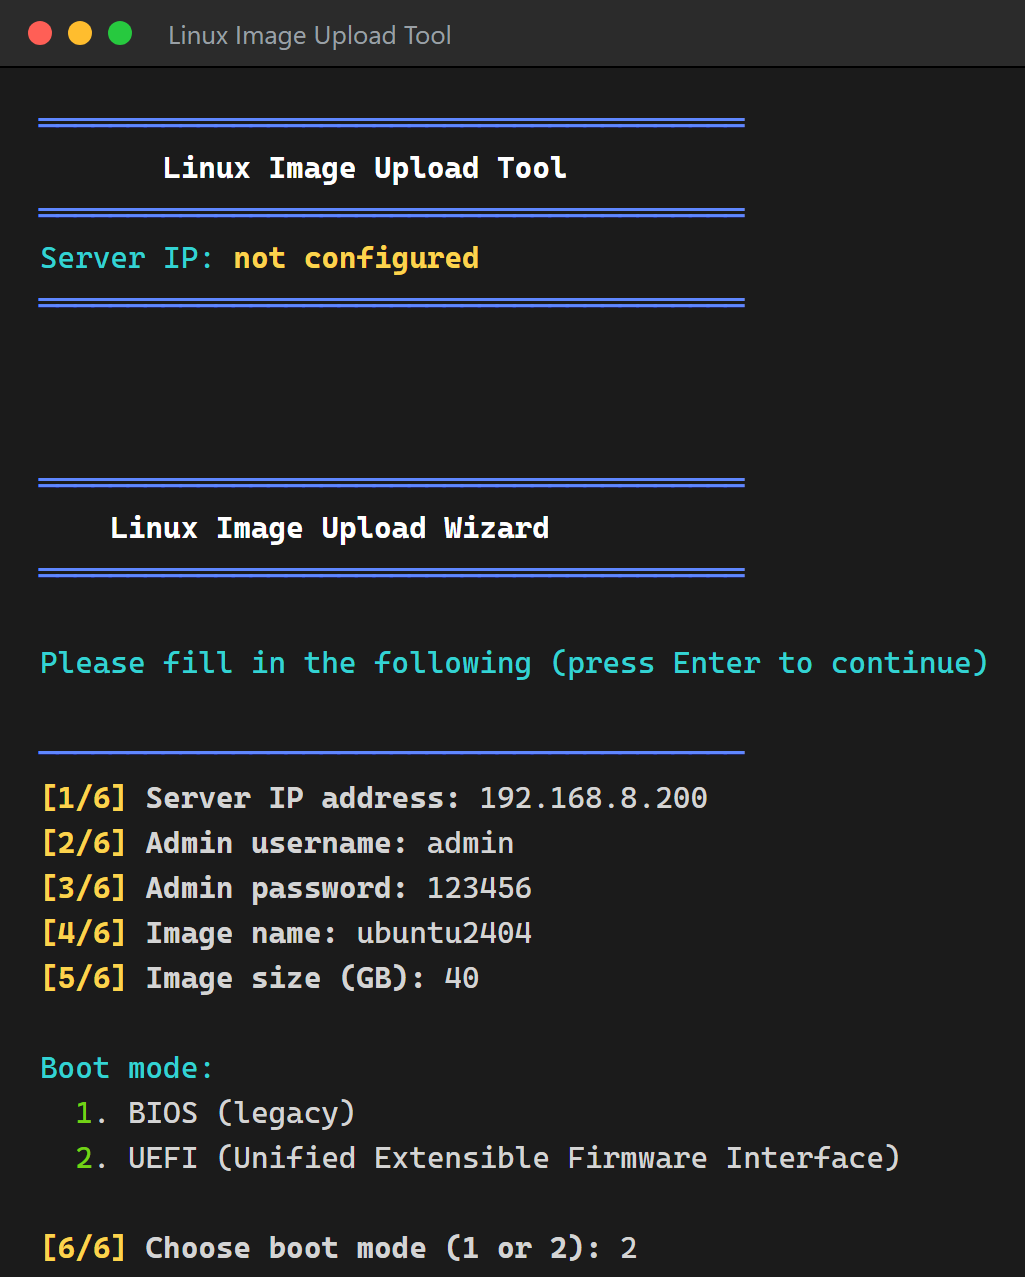
sudo ./diskless_upload.shThe script auto-detects your architecture, builds and loads the drivers matching your kernel (over the network), then opens the upload wizard. Fill in each field as prompted (press Enter after each):
| Field | Meaning |
|---|---|
[1/7] Server IP address | IP of the vDisk boot server |
[2/7] Admin username | Server administrator account |
[3/7] Admin password | Server administrator password |
[4/7] Image name | Name of the image to create |
[5/7] Image size (GB) | Virtual disk size; recommend ≥ used space of the current system |
[6/7] Boot mode | 1 = BIOS (legacy) / 2 = UEFI; must match the target machine |
[7/7] Architecture suffix | Optional; press Enter for the default (auto-detected via uname -m). For modified hardware that shares an arch but needs a dedicated boot disk (Huawei Kunpeng, Phytium, etc.), type a custom suffix (e.g. kunpeng, ft2000); it sets the naming of the deployment ISO / boot disk and the reported architecture |
4) Confirm and start the upload
A configuration summary is shown. After checking it, type Y and press Enter to start:
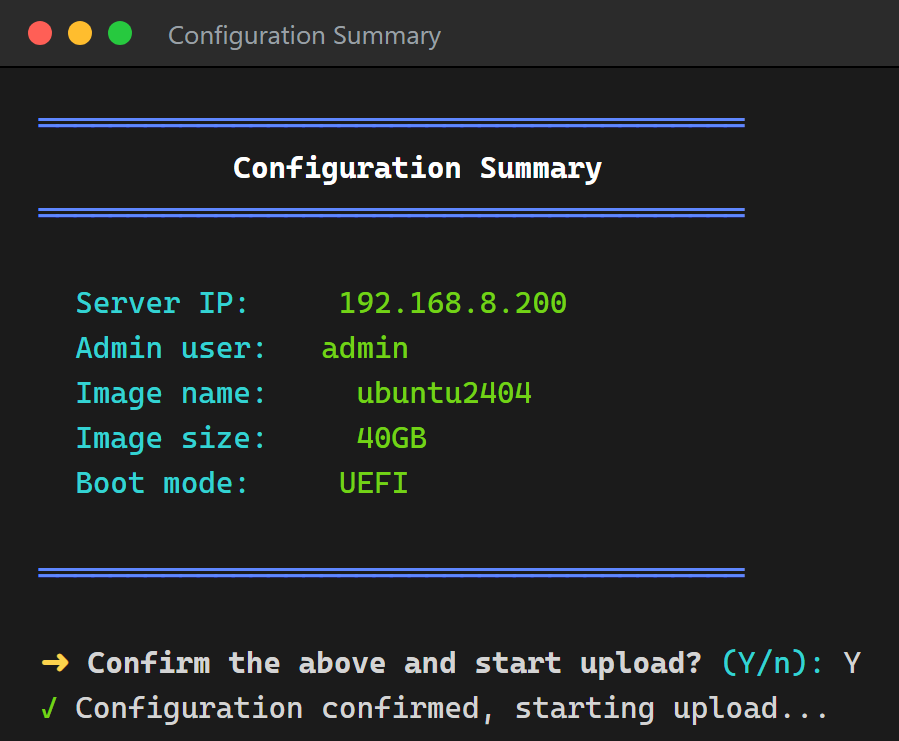
After confirming, the script automatically: initializes and partitions the virtual disk → formats it → installs the bootloader (per the chosen BIOS/UEFI) → builds the diskless boot initrd → uploads the local system to the virtual disk via rsync. Progress and upload percentage are shown on screen.
5) Upload complete
When the upload finishes, an action menu appears:
rreboot the systemspower off the systemccancel (go back)
The image is now uploaded to the server and can be assigned to client machines for diskless boot.
6) Make a boot disk from the deployment ISO to deploy other computers
When to use this: the target machine has no PXE NIC ROM / cannot easily change its network boot order, or you want a "plug-in-and-install" boot disk for mass deployment. During the upload, the script generates a deployment ISO on the fly using the local kernel; turn it into a USB stick to boot any bare machine into deployment — no PXE and no BIOS boot-order change needed.
6.1 Locate the generated ISO
When the upload finishes, the screen shows the ISO path. The file is named like vdisk-deploy-<arch>.iso (e.g. vdisk-deploy-aarch64.iso, vdisk-deploy-x86_64.iso). It bundles the local kernel + boot menu + drivers and is an isohybrid image (can be burned to a disc or written directly to a USB stick with dd).
⚠️ The ISO is architecture-specific: an arm64 ISO only boots arm64 machines, an x86_64 ISO only boots x86_64 machines. Use the ISO generated on a machine of the same architecture as the target.
6.2 Write the ISO to a USB stick
⚠️ You must write in DD (image) mode — never ISO mode! This ISO is a grub-mkrescue hybrid-boot image that can only be written raw, whole-disk. If you use Rufus's default "ISO Image mode", the files get repacked and at boot you get
error: unknown filesystemdropping intogrub rescue>. After clicking START in Rufus, when the "ISOHybrid image detected" dialog appears, be sure to choose Write in DD Image mode; or simply use balenaEtcher (always writes raw, never asks — the safest). After writing, Windows may say the USB needs formatting or show it as tiny/unreadable — that is normal, do not format it.
Pick one method (the USB stick's existing data will be erased — be sure to select the correct device):
Windows: use Rufus or balenaEtcher to write the ISO to the USB stick. When Rufus asks "ISO / DD mode", choose DD mode.
Linux / macOS: write it directly with
dd(confirm the USB device name withlsblkfirst and replace/dev/sdXwith it — do not write to the wrong disk):bashsudo dd if=vdisk-deploy-aarch64.iso of=/dev/sdX bs=4M status=progress conv=fsyncYou can also burn the ISO to a DVD.
6.3 Deploy other computers from the boot disk
- Plug the prepared USB stick into the target machine, and make sure it is on the same network as the vDisk boot server;
- Power on and press the one-time boot-menu hotkey (commonly
F12/F11/F9/Esc, varies by board) to boot temporarily from the USB stick (no need to change the default boot order in BIOS, and no PXE); - In the boot menu, choose join a computer / select the computer to boot;
- Follow the prompts to download and install the image; once done, the machine can boot disklessly as normal;
- The same USB stick can be reused for multiple machines of the same architecture.
The ISO boots on both BIOS and UEFI firmware; the target's "Computer Type / CPU Architecture" in the console must match its actual firmware and architecture (see Heterogeneous deployment).
Notes
An internet connection is required throughout: the drivers are compiled remotely online; without network the upload cannot complete.
The boot mode (BIOS / UEFI) must match the target client's firmware, otherwise the client may fail to boot.
Xinchuang multi-architecture is handled automatically — the script picks the correct architecture binary based on
uname -m. The new script automatically relaxes security hardening (KYSEC, etc.; see step 3 above) before uploading; if the upload is still blocked, or throughput collapses / drops to zero mid-way and appears stuck, it is most likely the security mechanism rescanning the network disk — disable it manually per step 3 and retry.The deployment ISO is architecture-specific; one ISO only boots machines of the same architecture (see step 6).